Rehabilitating a Grade 1 hamstring strain will respond very favourably to Pilates conditioning due to the lengthening and strengthening components that are present within the Pilates repertoire. This article presents a few exercise options.
What is a Grade 1 hamstring strain?
There will be a feeling of tightness or cramping, possibly slight pain, when the hamstrings are either stretched or contracted. The muscle fibres have minor tears in them. Walking without a limp is still possible. Recovery period is from 3-7 days. Return to sport is best at 3 weeks though most return before that.
Why do hamstring strains occur?
There are many reasons why and they are very specific to the individual. Most often, hamstring strains happen due to either tight hamstrings or a muscle strength imbalance between the quadriceps and the hamstrings.
When the quads extend (straighten) the knee, the hamstrings must let go, ideally with control, eccentrically. When the quads are much, much stronger, the pull into knee extension can be too much for the hamstrings to control and this action may end up with a tear to the muscle fibres.
When the muscle is too tight, it won’t be able to elongate to a sufficient enough length to accommodate the action and may result with a tear to the muscle fibres.
Posture, of course, always plays a role as well. So, assessing for muscle imbalances in the body is a must.
What can I do about it?
Immediately after a hamstring strain, use ice, wrap the muscle with a tensor bandage, elevate the leg and rest it. See your physiotherapist and get some treatment and guidance on when you can return to activity. As the trunk, hips and pelvis commonly show up with weaknesses, make sure you have a good assessment performed so you know where to concentrate with your rehab exercises.
You want to rebuild strength, enhance length, increase level of proprioception, challenge both stability and mobility in sagittal, frontal and horizontal planes.
Range of Motion
Range of motion exercises are always good when rehabilitating any muscle strain, so definitely include them in a warm up sequence. This is good to practice for the first several days so you keep your ankles, knees and hips moving through a dynamic range of motion without challenging them too much.
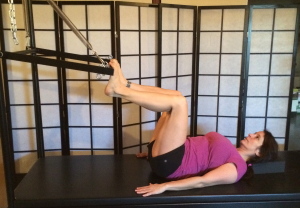
Knee and hip range of motion on the cadillac using the push through bar


1. Try not to hyperextend through your knees
2. Bend at your knee and hip, maintaining a neutral spine, control drawing bar towards you
3. Lengthen through your hamstrings as you control the bar upwards
RELEASE/REBUILD/RETRAIN – USING THE 3R METHOD
Rebuild/Retrain – working in the coronal plane
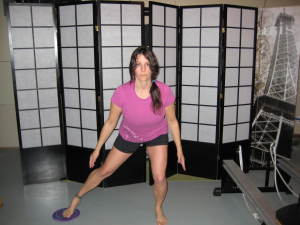
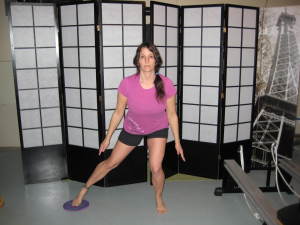
In the following example, rebuilding and retraining can be done within the same exercise


The above pictures are using ‘gliders’ but if you don’t happen to have those, wear a sock and it will slide easily on a floor.
As your stance leg has to stabilize and your moving leg gains length and strength, have your injured leg experience both of these positions. Your body is gaining strength but also “learns” how and where it should be when you are moving around.
- ensure that your stance leg “knee” does not buckle inwards, like in picture 2
- activate your stance leg gluteus medius and adductor muscles around your hip to keep it still
- lightly on the ball of your moving foot, press away using the outside of your hip and draw back in using your inner thigh muscles
Rebuild -Stationary lunge using the roll down bar – sagittal plane

- position yourself in a lunge position, injured leg will work in both positions
- the front leg will work the most; using quads, hamstrings and glutes to press up
- the back leg will feel the front of the hip stretched; use the glutes in the back leg to rise up
- staying in this lunge position, rise up, activating your glutes
- actively press your back heel behind you, as if you are pressing against a wall, to keep your back line of muscles working
- you are pressing down and slightly away through your shoulders (to help activate your serratus muscles) on the bar; thereby joining the upper body and lower body mechanics together
Release – Pigeon Pose
This pose will stretch the front leg’s glutes and lengthen the back leg’s hamstring muscles and hip flexor muscles
- keep your back leg in line with your body; don’t allow it to rest to the outside of your body
- keep reaching your back leg away from you
- think up nice and tall, and reach your chest forward as you lay your upper body down


Things to watch for:
No pain with the exercises! If you feel ready to progress to the next level exercise but begin to feel some discomfort, try shortening the range and ensure your body alignment is correct. If you still feel discomfort, you may not be ready for that level of exercise. Keep working at the lower level exercise, increase the range OR increase the amount of repetitions OR increase the holding time OR challenge the balance needed for that particular exercise. Never change more than one variable at a time. If you have questions or concerns about how your rehab is coming along, make sure you check in with your physiotherapist for some help! Progress slowly and steadily to ensure your hamstrings are happy and healthy hamstrings!

Love your advices ! Miss you here in Belgium !